Use the Preview dashboard to upload BAI files from your banking institution into OneStream. Data is automatically parsed during the upload process and is shown in a readable format in a preview grid. Key performance indicators (KPIs) are shown for the uploaded file. Data in the grid will change when a KPI is clicked. Once a file is verified, load the data directly into your workflow.

Preview Grid
The preview grid populates when a new BAI file is uploaded or a previously uploaded file is selected from the File Source drop-down list. Data in the grid is view only and can be filtered by clicking the parameter icon.
When a file is selected, the grid displays the following column information:
|
|
|
|
|
|
|
|
|
|
|
|
|
|
|
|
|
|
|
|
|
|
|
|
|
|
|
|
|
|
|
|
|
|
|
|
|
|
|
|
|
|
|
|
|
|
|
|
|
|
|
|
|
|
|
|
Export Grid Data
To export content from the overview grid, right-click in the grid and select Export.
Key Performance Indicators
After a BAI file is uploaded or selected from the drop-down list, KPIs are displayed. The layout of the preview grid changes when a KPI is clicked, populating with details of the selected metric.

Records Total
The Records Total KPI shows the total number of parsed rows in the BAI file. Data for this KPI displays by default in the preview grid after a file is uploaded.
BAI File Rows
BAI File Rows shows the total number of rows in the raw BAI file. Click the KPI to view the raw, imported version of the BAI file.
Transaction Summary
The Transaction Summary rows KPI shows the number of individual account transactions in the BAI file. Click the KPI to view a list of transactions.
The following columns will display in the summary grid:
|
|
|
|
|
|
|
|
|
|
|
|
|
|
|
|
|
Click any transaction in the summary grid to view more detailed information. A new grid displays below the summary grid and shows the following information:
-
TH_TypeCode
-
TH_Amount
-
TH_FundsType
-
TH_ImmediateAvailability
-
TH_OneDayAvailability
-
TH_MoreThanOneDayAvailability
-
TH_DateYYMMDD
-
TH_TimeHHMM
Warnings
The Warnings KPI shows any discrepancies found in the file, such as missing, required data or monetary transactions that do not total the associated summary balance. Click the Warnings KPI to view the flagged transactions.
Upload BAI Files
IMPORTANT: A Record Code must be included in the file or the upload will fail.
To upload a file into OneStream:
-
From the Preview Dashboard click the Upload button.
-
Use File Explorer to select the file to upload and then click Open.
The name of the uploaded file appears in the drop-down menu. The preview grid is populated with the file data.
View Previously Uploaded Files
View uploaded files using the File Source drop-down list on the Preview dashboard. The files in the drop-down list are specific to the workflow Point of View. If no files have been uploaded for the current time period, the drop-down list will be blank.
Example: When viewing the January workflow, all files uploaded in that month can be viewed in the drop-down list. If you are in the current month and no files have been uploaded, the drop-down list will be empty.
NOTE: The BAI Parser Solution does not require you to upload directly to the solution. You can load and automate files through the workflow. BAI files uploaded directly through the workflow process appear in the File Management overview grid, Global File Management overview grid, and in the File Source drop-down on the Preview dashboard.
Load Files to Workflows
|
|
The Load to Workflow icon enables users to import data from the BAI file to their current workflow. |

NOTE: Files can be imported to workflows even if a workflow has been completed. You cannot add data to workflows that are locked.
To load the data to the workflow:
-
From the Preview dashboard upload a new BAI file or select a file from the File Source drop-down menu.
-
Click the Load to Workflow icon.
-
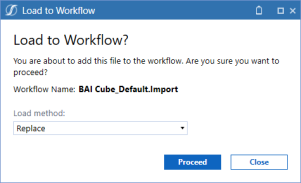
On the Load to Workflow dialog box, use the Load method drop-down list to select from the following options:
-
Replace: This will clear all data for the previous file that correlates with the specific Source ID and replace it with the new file’s data. This can be done even if the previous data has already been loaded into the Cube. Once the file is re-loaded, the user will need to complete all Workflow Tasks and load the new data into the Cube.
-
Replace (All Time): Replaces all Workflow Units in the selected Workflow View (if multi-period). Forces a replace of all time values in a multi-period workflow view.
-
Replace Background (All Time, All Source ID's): Replaces all Workflow Units in the selected Workflow View and all Source ID’s in a background thread while the new file parse or connector execution is running. The delete is being performed while parse is being performed.
-
Append: This is used when additional rows are added to a source file and need to be loaded into the Stage. This will not change any of the data already loaded for the source file. It will only add rows that were not included in the previous file load.
-
-
Click the Proceed button to import the file to the workflow.
-
Click the Close button to exit the dialog box.
NOTE: Completed uploads display as green. When re-uploading a completed file, the new upload can be verified by looking at the upload timestamp under the status and confirming the ID number.


